2021年08月31日
Daily Makeup
I worn different clothing every time and also changed makeup (skin) many times accordingly. But my friend said, “Vary little in character”, that was a littke shock for me. My faces were normally shown only in segmented pictures or in the profile at the left, but this time I will show off them with full size shots.

The above is for summer, a santanned skin. The below is my favorite one, with strong eyeshadow and red lipstick. All skins introduced here are free. There are many free skins in the “Library” at the bottom of inventory. Please refer to my previous articles.

I often use a pony-tail that I love, but I have many and occasionally change it for a change. This skin is almost a bare face. I have used many colored contact lenses, so I did not remember which color is my original eye.

The first date when I started SL said, “To change a shape is same as to do orthopedic surgery, so it is not recommended.” Since then. I have been using the same face. I got Bento last year but the face is basically the same. May be due to the same shape to vary little in character, but most people may not care for other faces.

Glasses should change the character to some extent, but no one mentioned about me with glasses. This was a try to be a bit square with light make-up.

One of my favorite sikins that provides some cool feeling. As I wrote before, my secret idol is Captain Amanda Garret, when invited by a king of smuggler to his party, appeared on the stage fully dressed up, standing at the helm of troopers who fit up with fully loaded weapons!

This is a face painting the other day, acting cutesy. No one noticed this too. Since a face painting is like this, who would care for nail arts or pedicures? The only way might be to enjoy oneself by shooting these self portraits, which could be one of things that cannot be done in RL.

The site which I had meant to copy when face painting. She is so charming!
Face Painting: https://www.youtube.com/watch?v=sfSY_83Aof4
2021年08月27日
Free Skins for Male
Following the last article, I tried free skins prepared for male. They are in the files “Initial Outfits” and “Older Outfits”, in the “Clothing” under “Library” at the bottom of the inventory.

Among the total of about 160 outfits, there are 40 for male, which is less than ones for female. I introduce 20 of them this time. Since I do not have male shape, I used the original outfits as-is. The ones with blue letter are in the “Initial Outfits”, and green, “Older Outfits”. M stans for Male.

Personally, I feel that the most ones for male are a bit dirty and unrealistic. The characters with mouse or scorpion on the shoulder might not be seen even in fantasy games, and at any rate, they have unpleasant look of eyes.

As the ones for female, most of them cannot be copied for other uses. It is possible to change the shape within the outfit. The left is the shape included in the outfit, and the right is me. This can be used for me. My shape is modified based on Genus Strong Face free gift, which I have been using daily.
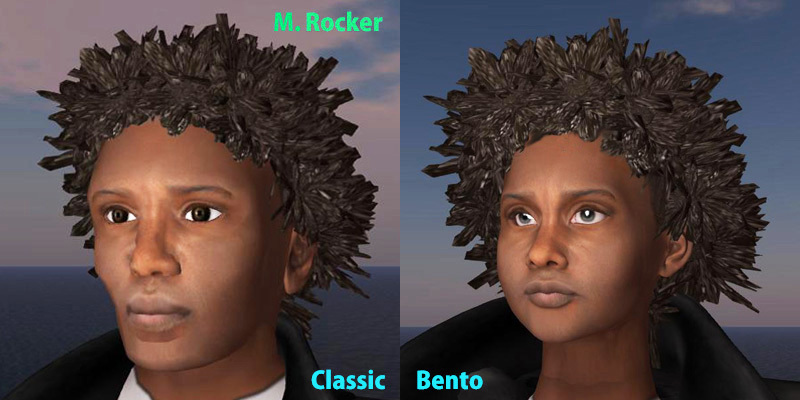
A fantasy-like outfit, the left is the original, the right is me. My shape is identical to the one used in the Rocker outfit shown above. This is a good example to show the big difference with changing skin only. On the other hand, it is possible to make practical outfit by adjusting shapes with these skins. Most of male would not care for daily makeups, but please try the library, that might give you some favorite skin suitable for your shape.

I have looking for some male skins that can be used for female, and checked all in the Library, but none I found. But as I introduced last week, thre are enough number of free female skins, so this wil conclude my skin search.
2021年08月23日
Free Skins
I have been playing with the skins, but getting back to the basics, I checked the free skins that were included in the system. At the bottom of the inventory, there is a file named “Library” and there are a lot of outfits in it.
There are more than 60 outfits in the file “Initial Outfits” and about 100 in the “Older Outfits”. They can be used as a set but here I tried to put only skins on my body.
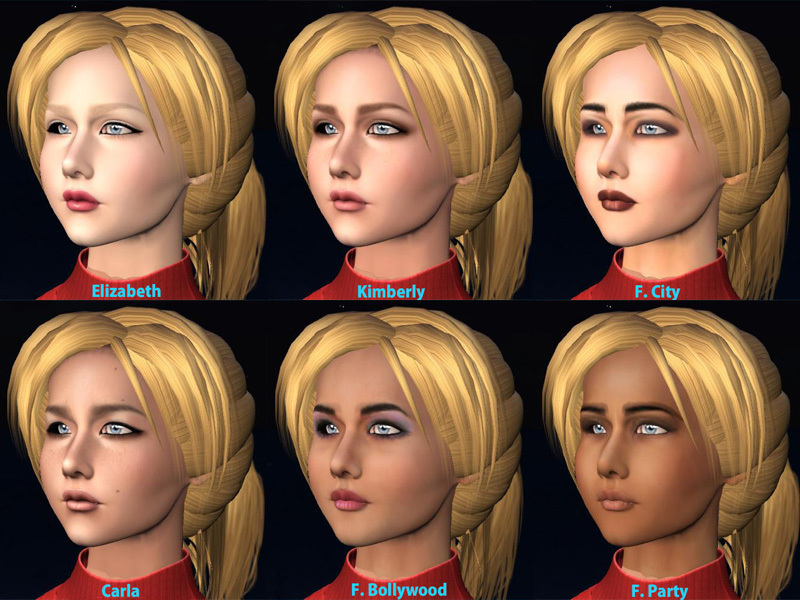
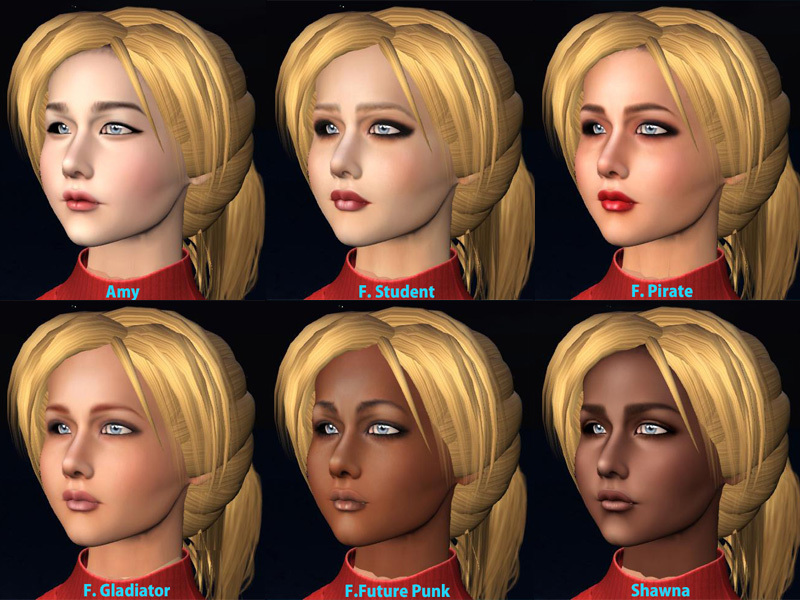
There are more than 160 outfits, but some of them are for male and animals, so ones for female are about one third of them. I do not see the reason but many of them can be neither used as the skin only nor copied for other outfits. The 24 ones intruded here are the editable and copyable. The blue letter is the title of the skin, where F stands for Female.

For comparison, I used identical shape, eyes, hair, facial expression and facelight for all skins. The tedious look is due to the long time for shooting. If these were adjusted accordingly, they could provide many usable variations. Also, it is possible to edit the tint or lipstick with the method I introduced before. Please do not neglect them as free outfits for beginners, instead, give it a try. There are some skins that I have been using daily.

These skins can be used on Bento heads. Please visit old articles.
Old skin on Bento 3: https://temioyen.tec29.com/e1703250.html
Old skin on Bento 1: https://temioyen.tec29.com/e1701403.html

There are more than 60 outfits in the file “Initial Outfits” and about 100 in the “Older Outfits”. They can be used as a set but here I tried to put only skins on my body.

There are more than 160 outfits, but some of them are for male and animals, so ones for female are about one third of them. I do not see the reason but many of them can be neither used as the skin only nor copied for other outfits. The 24 ones intruded here are the editable and copyable. The blue letter is the title of the skin, where F stands for Female.

For comparison, I used identical shape, eyes, hair, facial expression and facelight for all skins. The tedious look is due to the long time for shooting. If these were adjusted accordingly, they could provide many usable variations. Also, it is possible to edit the tint or lipstick with the method I introduced before. Please do not neglect them as free outfits for beginners, instead, give it a try. There are some skins that I have been using daily.

These skins can be used on Bento heads. Please visit old articles.
Old skin on Bento 3: https://temioyen.tec29.com/e1703250.html
Old skin on Bento 1: https://temioyen.tec29.com/e1701403.html
2021年08月19日
Face Painting
It became somewhat possible to edit skin, but it is too hard for me to create whole face. So, I challenged the face painting, which is the same way for tattoo.
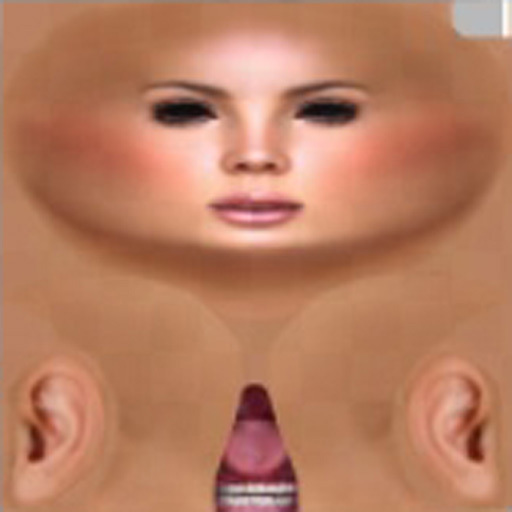
As same as the skin editing, it is necessary to know what area is transferred on actual avatar. This is the template prepared by Linden, which I put some color for reference to avatar face. Numbering the mesh could be OK.

The above template might be for creating face, so the area around nose and eyes are meshed in detail. This is not suitable for painting.
3: I made another one with grid. The grid should be put on a separate layer.
4: A skin was made with the skin and grid together, and put on an avatar, which will be used later.

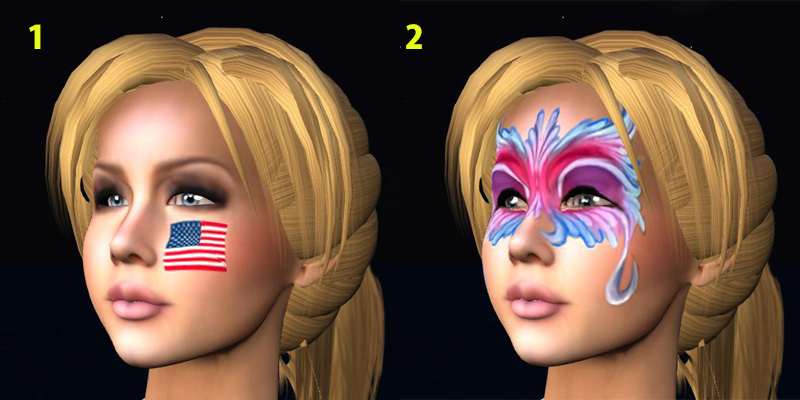
5: Firstly, make a painting with Photoshop on a picture of avatar that should be taken with the same angle as 4 that jhas the grid. The angle is preferable to show the grid as less distortion as possible. The painting should be done on a separate layer. Photographs of real things can be used. In the 1 I used a flag picture. If the image is symmetrical, it is necessary to paint only half of it.
6: The 4 and 5 should be doubled, then adjust the transparency to show both of them. This will be the reference picture to adjust the painting layer.
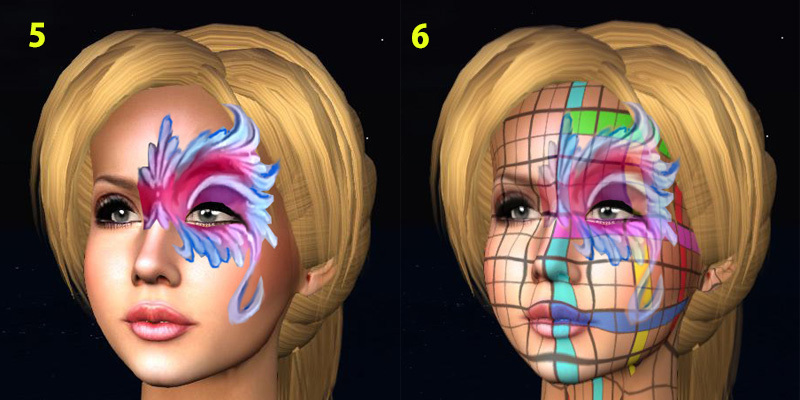
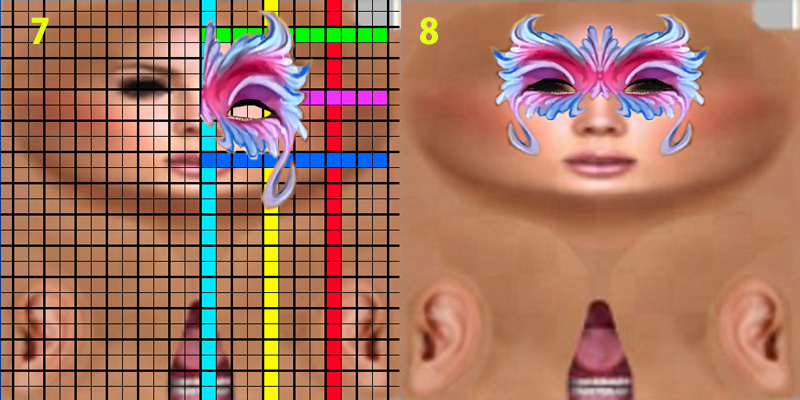
7: Take a copy of the painted layer made in 5 and paste it on the skin grid 3 as another layer. Then adjust the size and distortion of the layer to have the same relation as the grid on 6. After getting the adjustment, make a symmetrical copy for the other side.
8: Erase the grid layer. Finally. the detail and color will be adjusted at this stage. Put it on the avatar to check the position. The painted layer should be kept as a separate layer that can be modified anytime. It could be possible to start with painting directly on 8.
Took pictures for the record. Personally, I care for neither face painting nor tattoo, so it was interesting but not practical. ^-^ I wore it at the Baba Meeting Area but no one noticed it. It could be natural since we were dancing, but while sitting at another bar, none of seven guests mentioned about my face.;;

You can save L$10 while checking by using temporary upload, but there might be some tool that makes it possible to check it off-line. As before, the skin, template, or grid shown above can be used on avatars by copying them.

As same as the skin editing, it is necessary to know what area is transferred on actual avatar. This is the template prepared by Linden, which I put some color for reference to avatar face. Numbering the mesh could be OK.

The above template might be for creating face, so the area around nose and eyes are meshed in detail. This is not suitable for painting.
3: I made another one with grid. The grid should be put on a separate layer.
4: A skin was made with the skin and grid together, and put on an avatar, which will be used later.

5: Firstly, make a painting with Photoshop on a picture of avatar that should be taken with the same angle as 4 that jhas the grid. The angle is preferable to show the grid as less distortion as possible. The painting should be done on a separate layer. Photographs of real things can be used. In the 1 I used a flag picture. If the image is symmetrical, it is necessary to paint only half of it.
6: The 4 and 5 should be doubled, then adjust the transparency to show both of them. This will be the reference picture to adjust the painting layer.

7: Take a copy of the painted layer made in 5 and paste it on the skin grid 3 as another layer. Then adjust the size and distortion of the layer to have the same relation as the grid on 6. After getting the adjustment, make a symmetrical copy for the other side.
8: Erase the grid layer. Finally. the detail and color will be adjusted at this stage. Put it on the avatar to check the position. The painted layer should be kept as a separate layer that can be modified anytime. It could be possible to start with painting directly on 8.

Took pictures for the record. Personally, I care for neither face painting nor tattoo, so it was interesting but not practical. ^-^ I wore it at the Baba Meeting Area but no one noticed it. It could be natural since we were dancing, but while sitting at another bar, none of seven guests mentioned about my face.;;

You can save L$10 while checking by using temporary upload, but there might be some tool that makes it possible to check it off-line. As before, the skin, template, or grid shown above can be used on avatars by copying them.
2021年08月17日
Editing Classic Skin 2
Following the previous article. Let me introduce an example to edit classic skins, that is to make the skin texture off-line and upload it, the same way to create a new skin. When editing existing skins, it is necessary to download the skin texture to the PC. The circled area in the picture is the texture, but I do not know how to download it directly. If anyone knows, please teach me!

The only way I know is to use “Print Screen” and cut out the skin area. The skin texture should be square but the size is free. I am using 512-512 since it is convenient for uploading. If there is no need to use transparent area, JPEG can be used as the format. If this picture was set in PC, the skin editing process was half completed. If you are interested in, please copy the picture below, modify it as you like, and then upload. Do not forget to use an editable skin and keep a back-up.
These are the skins I used last time which were modified by Photoshop. The total color was changed on the left, and lip area was changed on the right.

For the skin creating there are templates provided by Linden. The left is for head. The colors on the edges show the connecting spots to other parts. The black area has no meaning. The right shows a layer added to a skin. This will be used to judge the area to be changed. It is important to note that this is not a shape. The area of eyes, nose, or mouth should exactly follow this template. If the mouth or nose were expanded here, on the avatar it simply ends up with lipstick painted out of mouth, or texture next to nose.
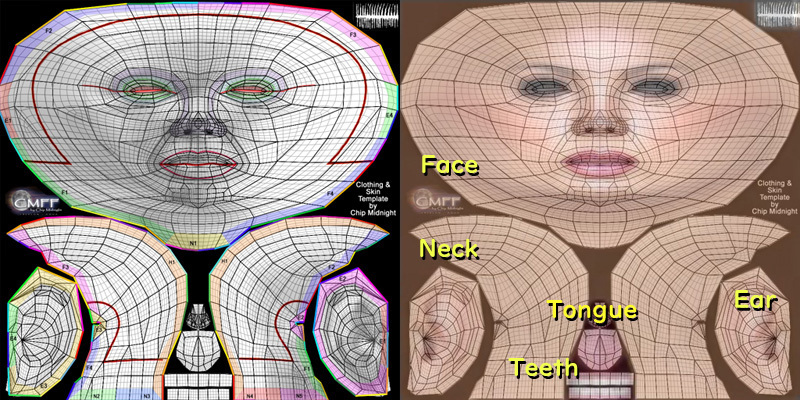
With this method it might be possible to make crimson tongue or to paint teeth with rainbow color. To create new skins, there are many sites in the net, so please see them.

The only way I know is to use “Print Screen” and cut out the skin area. The skin texture should be square but the size is free. I am using 512-512 since it is convenient for uploading. If there is no need to use transparent area, JPEG can be used as the format. If this picture was set in PC, the skin editing process was half completed. If you are interested in, please copy the picture below, modify it as you like, and then upload. Do not forget to use an editable skin and keep a back-up.

These are the skins I used last time which were modified by Photoshop. The total color was changed on the left, and lip area was changed on the right.

For the skin creating there are templates provided by Linden. The left is for head. The colors on the edges show the connecting spots to other parts. The black area has no meaning. The right shows a layer added to a skin. This will be used to judge the area to be changed. It is important to note that this is not a shape. The area of eyes, nose, or mouth should exactly follow this template. If the mouth or nose were expanded here, on the avatar it simply ends up with lipstick painted out of mouth, or texture next to nose.

With this method it might be possible to make crimson tongue or to paint teeth with rainbow color. To create new skins, there are many sites in the net, so please see them.