
2012年06月23日
Yacht Praqctice 3
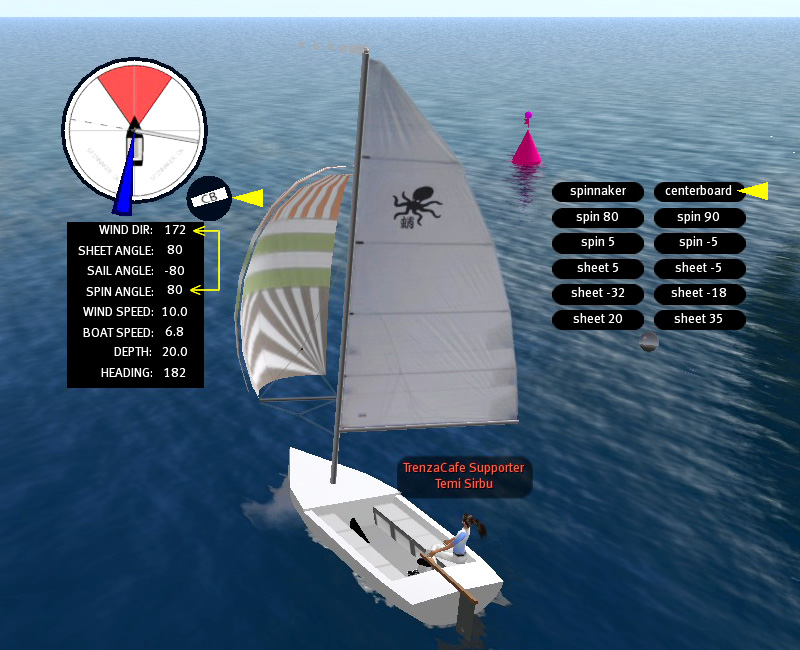
We practiced spinnaker, centerboard, and Button HUD.
Info HUD and Button HUD are possible to be moved to desirable place by ‘Edit”.
Info HUD background can be changed to transparent by touching it.
Let’s practice the spinnaker first, which is a round sail for tailwind.
Touch the ‘spinnaker’ button at the top of Button HUD. A dark sail will come out in front of the main sail. Touch again the button to erase it.

Spinnaker is effective only with tailwind. When it is not effective, it will turn black.
Note the fourth number in the Info HUD, ‘spin angle’.
Spinnaker also needs angle adjustment as the main sail. Since the spinnaker is moved directly, there is only one angle number.
Watch how the number changes by touching Page UP and Page Down.
The best angle for the spinnaker is wind angle minus 90 degrees.
The angle is set as 0 when it is deployed, so it needs adjustment to about 80 degrees.
The spinnaker turns black if the angle is not correct even in the tail wind.
Let us practice the centerboard that is a flat board protruding from the bottom to make the yacht possible to sail with an angle toward the wind.
It will make resistance, so it is pulled up when running with tailwind.
Touch the ‘centerboard’ at the top of Button HUD and watch the black circle right below the Info HUD. The bar in the circle shows the condition, vertical is down, lateral is up.
In the Trenza Yacht course, the centerboard will be up when running behind the island, but it should be down again before the next turn, otherwise you cannot make turn.
Wow, there are so many things to be done at the blue buoy! To change the direction, to adjust the main sail angle, to extend spinnaker, to adjust the spinnaker angle, and to pull up the centerboard! If you do all these through command, the yacht will lose speed meantime.
Here comes the Button HUD.
Button HUD is like a programmable function key of PC. It is possible to preset necessary commands on these buttons. There are several commands were set already. You can use them as they are.
Touch ‘sheet 20’ and watch the sheet angle increased by 20. Touch other buttons and see the effects.
In order to set a new command, chat window is used.
At first, memorize the number of button. The bottom left is 1, next right is 2, accordingly 3,4, and the top ones are 9 on the left and 10 on the right.
It is recommended to leave ‘spinnaker’ and ‘centerboard’ as they are so far.
To set a new command, type in ‘button X command’, ex. button 7 spinnaker 80.
Multiple commands cannot be set on one button.
The command to be set depends on the line that you take. For an example, if you would like to change the main sail angle from 25 to 48 at the red buoy, preset the button 1 as sheet 23. When turning the red buoy, touch the button 1 while changing the yacht direction.
When turning the blue buoy toward tailwind running, while pushing left arrow key to change the direction with left hand, touch the following buttons in sequence by right hand, ‘sheet -32’ , ‘spinnaker’, ‘spin 80’, and ‘centerboard’
How to get speed is the same as DG470 that was explained in the previous training.
Please see my old article in my blog
http://temisirbu.slmame.com/e1171038.html

Info HUD and Button HUD are possible to be moved to desirable place by ‘Edit”.
Info HUD background can be changed to transparent by touching it.
Let’s practice the spinnaker first, which is a round sail for tailwind.
Touch the ‘spinnaker’ button at the top of Button HUD. A dark sail will come out in front of the main sail. Touch again the button to erase it.

Spinnaker is effective only with tailwind. When it is not effective, it will turn black.
Note the fourth number in the Info HUD, ‘spin angle’.
Spinnaker also needs angle adjustment as the main sail. Since the spinnaker is moved directly, there is only one angle number.
Watch how the number changes by touching Page UP and Page Down.
The best angle for the spinnaker is wind angle minus 90 degrees.
The angle is set as 0 when it is deployed, so it needs adjustment to about 80 degrees.
The spinnaker turns black if the angle is not correct even in the tail wind.

Let us practice the centerboard that is a flat board protruding from the bottom to make the yacht possible to sail with an angle toward the wind.
It will make resistance, so it is pulled up when running with tailwind.
Touch the ‘centerboard’ at the top of Button HUD and watch the black circle right below the Info HUD. The bar in the circle shows the condition, vertical is down, lateral is up.
In the Trenza Yacht course, the centerboard will be up when running behind the island, but it should be down again before the next turn, otherwise you cannot make turn.
Wow, there are so many things to be done at the blue buoy! To change the direction, to adjust the main sail angle, to extend spinnaker, to adjust the spinnaker angle, and to pull up the centerboard! If you do all these through command, the yacht will lose speed meantime.
Here comes the Button HUD.
Button HUD is like a programmable function key of PC. It is possible to preset necessary commands on these buttons. There are several commands were set already. You can use them as they are.
Touch ‘sheet 20’ and watch the sheet angle increased by 20. Touch other buttons and see the effects.
In order to set a new command, chat window is used.
At first, memorize the number of button. The bottom left is 1, next right is 2, accordingly 3,4, and the top ones are 9 on the left and 10 on the right.
It is recommended to leave ‘spinnaker’ and ‘centerboard’ as they are so far.
To set a new command, type in ‘button X command’, ex. button 7 spinnaker 80.
Multiple commands cannot be set on one button.
The command to be set depends on the line that you take. For an example, if you would like to change the main sail angle from 25 to 48 at the red buoy, preset the button 1 as sheet 23. When turning the red buoy, touch the button 1 while changing the yacht direction.
When turning the blue buoy toward tailwind running, while pushing left arrow key to change the direction with left hand, touch the following buttons in sequence by right hand, ‘sheet -32’ , ‘spinnaker’, ‘spin 80’, and ‘centerboard’
How to get speed is the same as DG470 that was explained in the previous training.
Please see my old article in my blog
http://temisirbu.slmame.com/e1171038.html


SL World Atlas
Reminisce about Yachts 2
Reminisce about Yachts
Face Painting
Last sailing
Happy New Year!
Reminisce about Yachts 2
Reminisce about Yachts
Face Painting
Last sailing
Happy New Year!
Posted by Temi Oyen at 06:40│Comments(0)
│Yacht